1.认识REST
1.1什么是REST
REST是软件架构的规范体系结构,它将资源的状态以适合客户端的形式从服务器端发送到客户端(或相反方向)。在REST中,通过URL进行资源定位,用https动作GET、POST、DELETE、PUSH等)描述操作,完成功能。
道循RESTful风格,可以使开发的接口通用,以便调用者理解接口的作用。基于REST构建的 API 就是 RESTful ( REST 风格)API.
各大机构提供的API基本都是RESTful风格的。这样可以统一规范,减少沟通、学习和开发 的成本。
1.2 REST的特征
- 客户一服务器(client-server):提供服务的服务器和使用服务的客户端需要被隔离对待。
- 无状态(stateless):服务器端不存储客户的请求中的信息,客户的每一个请求必须包含服务器处理该请求所需的所有信息,所有的资源都可以通过URI定位,而且这个定位与其他资源无关,也不会因为其他资源的变化而变化。
Restful是典型的基于https的协议。https连接最显著的特点是:客户端发送的每次请求都需要服务器回送响应;在请求结束后,主动释放连接:
从建立连接到关闭连接的过程称为“一次连接”,前后的请求没有必然的联系,所以是无状态的
可缓存(cachable):服务器必须让客户知道请求是否可以被缓存。
分层系统(layered System):服务器和客户之间的通信必须被标准化。
统一接口 (uniform interface):客户和服务器之间通信的方法必须统一,REStful风格的 数据元操作 CRUD (create、read、update, delete)分别对应 https 方法—— GET 用来获取资源,POST用来新建资源,PUT用来更新资源,DELETE用来删除资源,这样就统一了数据操作的接口。
https状态码:状态码在REST中都有特定的意义:200、201、_202__、_204、400、401、 403、500,比如,401表示用户身份认证失败;403表示验证身份通过了,但资源没有权限进行操作。
支持按需代码(Code-On-Demand,可选):服务器可以提供一些代码或脚本,并在客户的运行环境中执行。
1.3 认识https方法与CRUD动作映射
RESTful风格使用同一个URL,通过约定不同的https方法来实施不同的业务。 普通网页的CRUD和RESTful风格的CRUD的区别,见下表。

可以看出,RESTful风格的CRUD比传统的CRUD简单明了,它通过https方法来区分增加、修改、删除和查询。
1.4 实现RESTfuI风格的数据增加、删除、修改和查询
在SpringBoot中,如果要返回JSON数据,则只需要在控制器中用@RestController注解。 如果提交https方法,则只需要使用注解@RequestMapping来实现,它有以下两个属性。
- Value:用来制定URI。
- Method:用来制定https请求方法。
为了不重复编码,尽量在类上使用@RequestMapping(“”)来指定上一级URL
使用RESTful风格操作数据的方法见以下代码。
(1)获取列表采用的是GET方式,返回List,例如,下面代码返回User的List。
@RequestMapping(value = "/",method = RequestMethod.GET)
public List<User> getUserList(){
    List<User> userList = new ArrayList<User>(userRepository.findAll());
    return userList;
}
|
(2)增加内容(提交内容)采用的是POST方式,一般返回String类型或int类型的数据,见 以下代码:
@RequestMapping(value = "/",method = RequestMethod.POST)
public String add(User user){
    userRepository.save(user);
    return "success";
}
|
(3)删除内容,必须采用DEIETE方法。一般都是根据id主键进行删除的
@RequestMapping(value = "/{id}",method = RequestMethod.DELETE)
public String delete(@PathVariable("id")Long id){
    userRepository.deleteById(id);
    return "success";
}
|
(4)修改内容,则采用PUT方法。
@RequestMapping(value = "/{id}",method = RequestMethod.PUT)
public String update(User user){
    userRepository.save(user);
    return "success";
}
|
(5)查询内容,和上面获取列表的方法一样,也是采用GET方法。
@RequestMapping(value = "/{id}",method = RequestMethod.GET)
public User findUser(@PathVariable("id")Integer id){
    Optional<User> user = userRepository.findById(id.longValue());
    return user.get();
}
|
对于RESTful风格的增加、删除、修改和查询,可以编写测试单元,也可以用Postman测试, 分别用GET、POST、PUT、DELETE方法提交测试。虽然这样实现了 RESTful风格,但还有一 个问题——返回的数据并不统一,在实际生产环境中还需要进行改进,所以需要设计统一的RESTful 风格的数据接口。
2.设计统一的RESTful 风格的数据接口
近年来,随着移动互联网的发展,各种类型的客户端层岀不穷。如果不统一数据接口,则会造成冗余编码,增加成本。RESTful风格的API正适合通过一套统一的接口为PC、手机APP等设备提供数据服务。
2.1 版本控制
随着业务需求的变更、功能的迭代,API的更改是不可避免的。当一个API修改时,就会出现很多问题,比如,可能会在API中新增参数、修改返回的数据类型。这就要考虑根据原先版本API 编写的客户端如何保留或顺利过渡。所以,需要进行版本控制。
REST不提供版本控制指南,常用的方法可以分为3种。
(1)通过URL
通过URL是最直接的方法,尽管它违背了 URI应该引用唯一资源的原则。当版本更新时,还可以保障客户端不会受到影响,如下面使用不同URL来确定不同版本。
二级目录的方式:
二级域名的方式:
还可以包括日期、项目名称或其他标识符。这些标识符对于开发API的团队来说足够有意义, 并旦随着版本的变化也足够灵活。
(2)通过自定义请求头
自定义头(例如,Accept-version)允许在版本之间保留URL。
(3)通过Accept标头
客户端在请求资源之前,必须要指定特定头,然后API接口负责确定要发送哪个版本的资源
2.2 过滤信息
如果记录数量很务,则服务器不可能一次都将它们返回给用户。API应该提供参数,实现分页返回結果。下面是一些常用的参数
- ?limit=10:指定返回记录的数量。
- ?page=5&size=10:指定第几页,以及每页的记录数。
- ?search_type=1:指定筛选条件。
2.3 确定https的方法
在RESTful中,https的方法有以下几种。
- GET:代表请求资源。
- POST:代表添加资源。
- PUT:代表修改资源。PUT是进行全部的修改,大家在编写修改功能时可能会遇到这样的情况:只修改了一个字段,但提交之后导致其他字段为空。这是因为,其他字段的值没有一 起提交,数据库默认为空值。如果只修改一个或几个字段,则可以使用PATCH方法。
- DELETE:代表删除资源。
- HEAD:代表发送https头消息,GET中其实也带了 https头消息。
- PATCH: PUT与PATCH方法比较相似,但它们的用法却完全不同,PUT用于替换资源, 而PATCH用于更新部分资源。
- OPTIONS:用于获取URI所支持的方法。返回的响应消息会在https头中包含”Allow” 的信息,其值是所支持的方法,如GET。
2.4 确定https的返回状态
https的返回状态一般有以下几种。
- 200:成功。
- 400:错误请求。
- 404:没找到资源。
- 403:禁止。
- 406:不能使用请求内容特性来响应请求资源,比如请求的是HTML文件,但是消费者的 https头包含了 JSON要求。
- 500:服务器内部错误。
2.5定义统一返回的格式
为了保障前后端的数据交互的顺畅,建议规范数据的返回,并采用固定的数据格式封装。如,
异常信息:
{
    "code":"10001",
    "msg":"异常信息",
    "data":null
}
|
{
	"code":200,
	"msg":"成功",
	"data":{
		"id":1,
		"name":"buretuzi",
		"age":2
	}
}
|
2.6 为手机APP、PC、H5网页提供统一风格的API
(1)实现响应的枚举类
枚举是一种特殊的数据类型,它是一种”类类型”,比类型多了一些特殊的约束。创建枚举类型要使用“enum”,表示所创建的类型都是java.lang.Enum(抽象类)的子类。见以下代码:
package com.itheima.exception;

public enum ExceptionMsg {
    SUCCESS("200","操作成功"),
    FAILED("999999","操作失败");
    private ExceptionMsg(String code,String msg){
        this.code = code;
        this.msg = msg;
    }
    private String code;
    private String msg;
}
|
(2)实现返回的对象实体
实现返回的对象实体,返回Code和Message (信息),见以下代码:
package com.itheima.domain;

public class Response {
    private String rspCode="200";
    private String rspMsg="操作成功";
}
|
(3)封装返回结果
这里把返回的结果逬行封装,以显示数据,见以下代码:
package com.itheima.dao;

import com.itheima.domain.Response;

public class ReponseData extends Response {
    private Object data;
    public ReponseData(Object data) {
        this.data = data;
    }
}
|
(4)统一处理异常
查看代码
package com.itheima.handler;
import com.itheima.exception.BusinessException;
import org.slf4j.Logger;
import org.slf4j.LoggerFactory;
import org.springframework.https.httpsStatus;
import org.springframework.https.converter.httpsMessageNotReadableException;
import org.springframework.validation.BindException;
import org.springframework.validation.BindingResult;
import org.springframework.validation.FieldError;
import org.springframework.web.httpsMediaTypeNotSupportedException;
import org.springframework.web.httpsRequestMethodNotSupportedException;
import org.springframework.web.bind.MethodArgumentNotValidException;
import org.springframework.web.bind.MissingServletRequestParameterException;
import org.springframework.web.bind.annotation.ExceptionHandler;
import org.springframework.web.bind.annotation.ResponseBody;
import org.springframework.web.bind.annotation.ResponseStatus;
import org.springframework.web.bind.annotation.RestControllerAdvice;
import javax.validation.ConstraintViolation;
import javax.validation.ConstraintViolationException;
import javax.validation.ValidationException;
import java.util.HashMap;
import java.util.Map;
import java.util.Set;
@RestControllerAdvice
public class GlobalExceptionHandler {
private static final Logger logger = LoggerFactory.getLogger(GlobalExceptionHandler.class);
@ResponseStatus(httpsStatus.BAD_REQUEST)
@ExceptionHandler(MissingServletRequestParameterException.class)
public Map<String, Object> handleMissingServletRequestParameterException(MissingServletRequestParameterException e){
logger.error("缺少请求参数");
Map<String, Object> map = new HashMap<String, Object>();
map.put("code",400);
map.put("message",e.getMessage());
return map;
}
@ResponseStatus(httpsStatus.BAD_REQUEST)
@ExceptionHandler(httpsMessageNotReadableException.class)
public Map<String, Object> handlehttpsMessageNotReadableException(httpsMessageNotReadableException e){
logger.error("缺少请求参数");
Map<String, Object> map = new HashMap<String, Object>();
map.put("code",400);
map.put("message",e.getMessage());
return map;
}
@ResponseStatus(httpsStatus.BAD_REQUEST)
@ExceptionHandler(MethodArgumentNotValidException.class)
public Map<String, Object> handleMethodArgumentNotValidException(MethodArgumentNotValidException e){
logger.error("参数验证失败",e);
BindingResult result = e.getBindingResult();
FieldError error = result.getFieldError();
String field = error.getField();
String code = error.getDefaultMessage();
String message = String.format("%s: %s",field,code);
Map<String, Object> map = new HashMap<String, Object>();
map.put("code",code);
map.put("message",message);
return map;
}
@ResponseStatus(httpsStatus.BAD_REQUEST)
@ExceptionHandler(BindException.class)
public Map<String, Object> handleBindException(BindException e){
logger.error("缺少请求参数",e);
Map<String, Object> map = new HashMap<String, Object>();
BindingResult result = e.getBindingResult();
FieldError error = result.getFieldError();
String field = error.getField();
String code = error.getDefaultMessage();
String message = String.format("%s: %s",field,code);
map.put("code",code);
map.put("message",message);
return map;
}
@ResponseStatus(httpsStatus.BAD_REQUEST)
@ExceptionHandler(ConstraintViolationException.class)
public Map<String, Object> handleConstraintViolationException(ConstraintViolationException e){
logger.error("缺少请求参数",e);
Set<ConstraintViolation<?>> violations = e.getConstraintViolations();
ConstraintViolation<?> violation = violations.iterator().next();
String message = violation.getMessage();
Map<String, Object> map = new HashMap<String, Object>();
map.put("code",400);
map.put("message",message);
return map;
}
@ResponseStatus(httpsStatus.BAD_REQUEST)
@ExceptionHandler(ValidationException.class)
public Map<String, Object> handleValidationException(ValidationException e){
logger.error("参数验证失败",e);
Map<String, Object> map = new HashMap<String, Object>();
map.put("code",400);
map.put("message",e.getMessage());
return map;
}
@ResponseStatus(httpsStatus.METHOD_NOT_ALLOWED)
@ExceptionHandler(httpsRequestMethodNotSupportedException.class)
public Map<String, Object> handlehttpsRequestMethodNotSupportedException(httpsRequestMethodNotSupportedException e){
logger.error("不支持当前请求方法",e);
Map<String, Object> map = new HashMap<String, Object>();
map.put("code",400);
map.put("message",e.getMessage());
return map;
}
@ResponseStatus(httpsStatus.UNSUPPORTED_MEDIA_TYPE)
@ExceptionHandler(httpsMediaTypeNotSupportedException.class)
public Map<String, Object> handlehttpsMediaTypeNotSupportedException(httpsMediaTypeNotSupportedException e){
logger.error("不支持当前媒体类型",e);
Map<String, Object> map = new HashMap<String, Object>();
map.put("code",415);
map.put("message",e.getMessage());
return map;
}
@ResponseBody
@ExceptionHandler(BusinessException.class)
public Map<String, Object> businessExceptionHandler(BusinessException e){
logger.error("自定义业务失败",e);
Map<String, Object> map = new HashMap<String, Object>();
map.put("code",e.getCode());
map.put("message",e.getMessage());
return map;
}
@ExceptionHandler(value = Exception.class)
public Map<String, Object> defaultErrorHandler(Exception e){
logger.error("自定义业务失败",e);
Map<String, Object> map = new HashMap<String, Object>();
map.put("code",500);
map.put("message",e.getMessage());
return map;
}
}
|
(5)编写测试控制器
package com.itheima.controller;
import com.itheima.exception.BusinessException;
import org.springframework.web.bind.annotation.RequestMapping;
import org.springframework.web.bind.annotation.RequestParam;
import org.springframework.web.bind.annotation.RestController;
@RestController
public class TestController {
@RequestMapping("BusinessException")
public String testBusinessExceptionStatus(@RequestParam("i") int i){
if (i == 0){
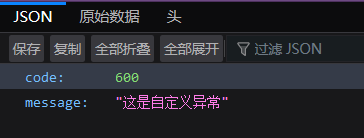
throw new BusinessException(600,"这是自定义异常");
}
return "success";
}
}
|
运行项目,访问https://localhost:8080/BusinessException?i=0,在网页中返回如下 JSON 格式的数据:
(6)实现数据的增加、删除、修改和查询控制器
package com.itheima.controller;
import com.itheima.dao.ReponseData;
import com.itheima.dao.UserRepository;
import com.itheima.domain.Response;
import com.itheima.domain.User;
import com.itheima.exception.ExceptionMsg;
import org.springframework.beans.factory.annotation.Autowired;
import org.springframework.web.bind.annotation.*;
import java.util.*;

@RestController
@RequestMapping("/user")
public class UserController {
    protected Response result(ExceptionMsg msg){
        return new Response();
    }
    protected Response result(){
        return new Response();
    }
    @Autowired
    private UserRepository userRepository;

    @RequestMapping(value = "",method = RequestMethod.GET)
    public ReponseData getUserList(){
        List<User> list = new ArrayList<>(userRepository.findAll());
        return new ReponseData(ExceptionMsg.SUCCESS,list);
    }

    @RequestMapping(value = "",method = RequestMethod.POST)
    public ReponseData add(User user) {
        userRepository.save(user);
        List<User> list = new ArrayList<>(userRepository.findAll());
        return new ReponseData(ExceptionMsg.SUCCESS,user);
    }

    @RequestMapping(value = "/{id}",method = RequestMethod.DELETE)
    public Response delete(@PathVariable("id") Long id) {
        userRepository.deleteById(id);
        return result(ExceptionMsg.SUCCESS);
    }

    @RequestMapping(value = "/{id}",method = RequestMethod.PUT)
    public ReponseData update(User user) {
        userRepository.save(user);
        return new ReponseData(ExceptionMsg.SUCCESS,user);
    }

    @RequestMapping(value = "/{id}",method = RequestMethod.GET)
    public ReponseData findUser(@PathVariable("id") int id) {
        Optional<User> user = userRepository.findById((long) id);
        if (user.get()!=null) {
            return new ReponseData(ExceptionMsg.SUCCESS,user);
        }
        return new ReponseData(ExceptionMsg.FAILED,user);
    }
}
|
3. 用Swagger实现接口文档
在项目开发中,一般都是前后端分离开发的,需要由前后端工程师共同定义接口:编写接口文档,之后大家都根据这个接口文档进行开发、维护。为了便于编写和维护稳定,可以使用Swagger来编写API接口文档,以提升团队的沟通效率。
3.1 配置Swagger
(1)添加Swagger依赖
<dependency>
    <groupId>io.springfox</groupId>
    <artifactId>springfox-swagger2</artifactId>
    <version>2.7.0</version>
</dependency>
<dependency>
    <groupId>io.springfox</groupId>
    <artifactId>springfox-swagger-ui</artifactId>
    <version>2.7.0</version>
</dependency>
|
(2)创建Swagger配置类
package com.itheima.config;
import org.springframework.context.annotation.Bean;
import org.springframework.context.annotation.Configuration;
import springfox.documentation.builders.ApiInfoBuilder;
import springfox.documentation.builders.PathSelectors;
import springfox.documentation.builders.RequestHandlerSelectors;
import springfox.documentation.service.ApiInfo;
import springfox.documentation.spi.DocumentationType;
import springfox.documentation.spring.web.plugins.Docket;
import springfox.documentation.swagger2.annotations.EnableSwagger2;
@Configuration
@EnableSwagger2
public class Swagger2 {
@Bean
public Docket createRestApi(){
return new Docket(DocumentationType.SWAGGER_2)
.apiInfo(apiInfo())
.select()
.apis(RequestHandlerSelectors.basePackage(""))
.paths(PathSelectors.any())
.build();
}
private ApiInfo apiInfo(){
return new ApiInfoBuilder()
.title("RESTful APIs")
.description("RESTful APIs")
.termsOfServiceUrl("https://localhost:8080/")
.contact("long")
.version("1.0")
.build();
}
}
|
代码解释如下。
- @Configuration: 让Spring来加载该类配置。
- @EnableSwagger2: 启用 Swagger2.createRestApi 函数创建 Docket 的 Bean
- apilnfo():用来展示该API的基本信息。
- select():返回一个ApiSelectorBuilder实例,用来控制哪些接口暴露给Swagger来展现。
- apis(RequestHandlerSelectors.basePackage()):配置包扫描路径。Swagger 会扫描包下所有Controller定义的API,并产生文档内容。如果不想产生API,则使用注解 @Apilgnore
(3)编写接口文档
在完成上述配置后,即生成了文档,但是这样生成的文档主要针对请求本身,而描述自动根据方法等命名产生,对用户并不友好。所以,通常需要自己增加一些说明以丰富文档内容。可以通过以下注解来增加说明。
- @Api:描述类/接口的主要用途。
- @ApiOperation:描述方法用途,给API增加说明。
- @ApilmplicitParam: 挡述方法的参数,给参数増加说距。
- @ApilmplicitParams: 描述方法的参数(Multi-Params ),给参数增加说明。
- @Apilgnore:忽略某类/方法/参数的义档。
@ApiOperation(value = "删除用户",notes = "根据URL的id来指定删除对象")
@ApiImplicitParam(name = "id",value = "文章ID",required = true,dataType = "Long")
public String del(@PathVariable("id") Long id) {
    userRepository.deleteById(id);
    return "SUCCESS";
}
|
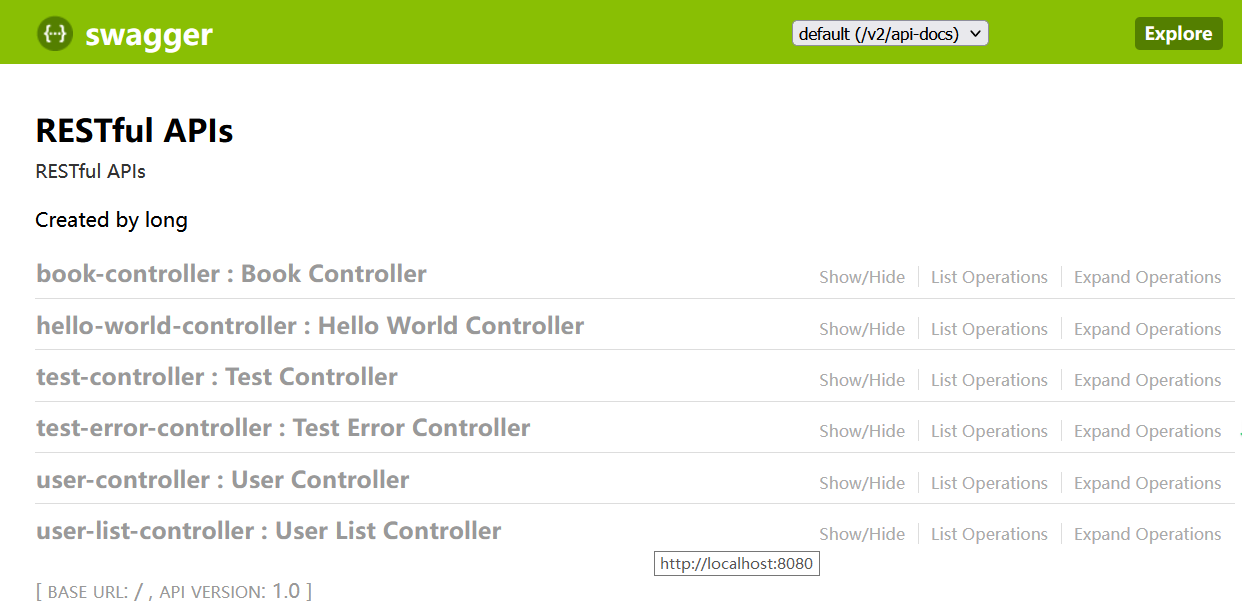
完成上述代码后,启动项目,访问https://localhost:8080/swagger-ui.html就能看到所展示的RESTful API的页面,可以通过单击具体的API测试请求,来查看代码中配置的信息,以及参数的描述信息。
3.2 用RestTemplate发起请求
(1)认识 RestTemplate
在Java应用程序中访问RESTful服务,可以使用Apache的httpsClient来实现。不过此方法使用起来太烦琐。Spring提供了一种简单便捷的模板类一RestTemplate来进行操作。RestTemplate是Spring提供的用于访问REST服务的客户端,它提供了多种便捷访问远程https 服务的方法,能够大大提高客户端的编写效率。
RestTemplate用于同步Client端的核心类,简化与https服务的通信。在默认情况下, RestTemplate默认依赖JDK的https连接工具。也可以通过setRequestFactory属性切换到不同的 https 源,比如 Apache httpsComponents, Netty 和 Okhttps。
RestTemplate简化了提交表单数据的难度,并附帯自动转换为JSON格式数据的功能。该类的入口主要是根据https的6种方法制定的,见下表。
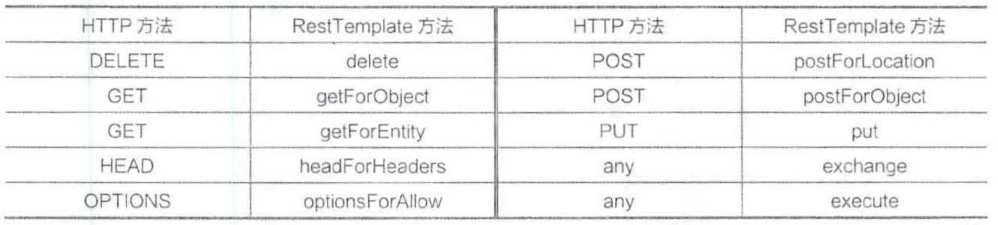
此外,exchange和excute也可以使用上述方法。
RestTemplate 默认使用 httpsMessageConverter 将 https 消息转换成 POJO,或从 POJO 转换成https消息,默认情况下会注册MIME类型的转换器,但也可以通过setMessageConverters 注册其他类型的转换器。
(2)用 RestTemplate 发送 GET 请求
1.创建测试实体
package com.intehel.domain;

import lombok.AllArgsConstructor;
import lombok.Data;

@Data
@AllArgsConstructor
@NoArgsConstructor
public class User {
    private long id;
    private String name;
}
|
2.创建用于测试的API
package com.intehel.controller;

import com.intehel.domain.User;
import org.springframework.web.bind.annotation.RequestMapping;
import org.springframework.web.bind.annotation.RequestMethod;
import org.springframework.web.bind.annotation.RestController;

@RestController
public class TestController {
    @RequestMapping(value = "/getParameter", method = RequestMethod.GET)
    public User getParameter(User user){
        return user;
    }
    @RequestMapping(value = "/getuser1", method = RequestMethod.GET)
    public User user1(){
        return new User(1,"buretuzi");
    }
    @RequestMapping(value = "/postuser", method = RequestMethod.POST)
    public User postUser(User user){
        System.out.println("name:"+user.getName());
        System.out.println("id:"+user.getId());
        return user;
    }
}
|
3.使用getForEntity测试
(1)返回String,不带参数,见以下代码:
package com.intehel;

import org.junit.Test;
import org.springframework.boot.web.client.RestTemplateBuilder;
import org.springframework.https.ResponseEntity;
import org.springframework.web.client.RestTemplate;

public class test {
    @Test
    public void nparameters(){
        RestTemplateBuilder restTemplateBuilder = new RestTemplateBuilder();
        RestTemplate client = restTemplateBuilder.build();
        ResponseEntity<String> responseEntity = client.getForEntity("https://localhost:8080/getuser1",String.class);
        System.out.println(responseEntity.getBody());
    }
}
|
控制台打印结果:
11:01:35.973 [main] DEBUG org.springframework.web.client.RestTemplate - https GET https://localhost:8080/getuser1
11:01:35.991 [main] DEBUG org.springframework.web.client.RestTemplate - Accept=[text/plain, application/json, application/*+json, */*]
11:01:36.073 [main] DEBUG org.springframework.web.client.RestTemplate - Response 200 OK
11:01:36.073 [main] DEBUG org.springframework.web.client.RestTemplate - Reading to [java.lang.String] as "application/json"
{"id":1,"name":"buretuzi"}
(2)返回String,带参数的例子。
在调用服务提供者提供的接口时,有时需要传递参数,有以下两种不同的方式。
①用一个数字做占位符。最后是一个可变长度的参数,用来替换前面的占位符。使用方法见以下代码:
@Test
public void withparameters(){
    RestTemplateBuilder restTemplateBuilder = new RestTemplateBuilder();
    RestTemplate client = restTemplateBuilder.build();
    ResponseEntity<String> responseEntity = client.getForEntity("https://localhost:8080/getParameter?name={1}&id={2}",String.class,"buretuzi",2);
    System.out.println(responseEntity.getBody());
}
|
打印结果:
11:06:20.893 [main] DEBUG org.springframework.web.client.RestTemplate - https GET https://localhost:8080/getParameter?name=buretuzi&id=2
11:06:20.893 [main] DEBUG org.springframework.web.client.RestTemplate - Accept=[text/plain, application/json, application/*+json, */*]
11:06:20.908 [main] DEBUG org.springframework.web.client.RestTemplate - Response 200 OK
11:06:20.908 [main] DEBUG org.springframework.web.client.RestTemplate - Reading to [java.lang.String] as "application/json"
{"id":2,"name":"buretuzi"}
② 使用name={name}这种形式。最后一个参数是一个map, map的key即为前边占位符的名字,map的value为参数值。使用方法见以下代码:
@Test
public void withparameters2(){
    RestTemplateBuilder restTemplateBuilder = new RestTemplateBuilder();
    RestTemplate client = restTemplateBuilder.build();
    Map<String,String> map = new HashMap<String,String>();
    map.put("name", "buretuzi");
    ResponseEntity<String> responseEntity = client.getForEntity("https://localhost:8080/getParameter?name={name}&id=3",String.class,map);
    System.out.println(responseEntity.getBody());
}
|
打印结果:
11:19:28.842 [main] DEBUG org.springframework.web.client.RestTemplate - https GET https://localhost:8080/getParameter?name=buretuzi&id=3
11:19:28.848 [main] DEBUG org.springframework.web.client.RestTemplate - Accept=[text/plain, application/json, application/*+json, */*]
11:19:28.880 [main] DEBUG org.springframework.web.client.RestTemplate - Response 200 OK
11:19:28.880 [main] DEBUG org.springframework.web.client.RestTemplate - Reading to [java.lang.String] as "application/json"
{"id":3,"name":"buretuzi"}
(3)返回对象,见以下代码:
@Test
public void restUser(){
    RestTemplateBuilder restTemplateBuilder = new RestTemplateBuilder();
    RestTemplate client = restTemplateBuilder.build();
    ResponseEntity<User> responseEntity = client.getForEntity("https://localhost:8080/getuser1",User.class);
    System.out.println(responseEntity.getBody().getId());
    System.out.println(responseEntity.getBody().getName());
}
|
打印结果:
1
buretuzi
4.使用 getForObject
getForObject函数是对getForEntity函数的进一步封装。如果你只关注返回的消息体的内容, 对其他信息都不关注,则可以使用getForObject,见以下代码:
@Test
public void getForObject(){
    RestTemplateBuilder restTemplateBuilder = new RestTemplateBuilder();
    RestTemplate client = restTemplateBuilder.build();
    User user = client.getForObject("https://localhost:8080/getuser1",User.class);
    System.out.println(user.getName());
}
|
(3)用 RestTemplate 发送 POST 请求
在 RestTemplate 中,POST 请求可以通过 postForEntity、postForObject、postForLocation、exchange四种方法来发起。
1.方法一:使用 postForEntity
- postForEntity(String url,Object request,Class responseType,Object… urlVariables)
- postForEntity(String url,Object request,Class responseType,Map urlVariables)
- postForEntity(String url,Object request,Class responseType)
2.方法二:使用 postForObject
- postForObject(String url,Object request,Class responseType,Object… urlVariables)
- postForObject(String url,Object request,Class responseType,Map urlVariables)
- postForObject(String url,Object request,Class responseType)
3.方法三:使用 postForLocation
postForLocation也用于提交资源。在提交成功之后,会返回新资源的URI。它的参数和前面两种方法的参数基本一致,只不过该方法的返回值为URI,表示新资源的位置
- postForLocation(String url,Object request,Object… urlVariables)
- postForLocation(String url,Object request,Map urlVariables)
- postForLocation(String url,Object request)
4.方法四:使用exchange
使用exchange方法可以指定调用方式,使用方法如下:
ResponseEntityresponse=tempIate.exchang(newUrl, httpsMethod.DELETE, request, String.class);
5.实现发送POST请求
(1)使用 postForEntity
@Test
public void postForEntity(){
    RestTemplateBuilder restTemplateBuilder = new RestTemplateBuilder();
    RestTemplate client = restTemplateBuilder.build();
    MultiValueMap<String,Object> paramMap = new LinkedMultiValueMap<String,Object>();
    paramMap.add("name","buretuzi");
    paramMap.add("id",4);
    ResponseEntity<User> responseEntity = client.postForEntity("https://localhost:8080/postuser",paramMap,User.class);
    System.out.println(responseEntity.getBody().getName());
}
|
代码解释如下。
- MultiValueMap:封装参数,千万不要替换为Map与HashMap,否则参数无法被传递
- postForEntity(“url”, paramMap, User.class):参数分别表示要调用的服务的地址、上传的参数、返回的消息体的数据类型。
运行测试单元,控制台输出如下结果:
11:39:07.001 [main] DEBUG org.springframework.web.client.RestTemplate - https POST https://localhost:8080/postuser
11:39:07.032 [main] DEBUG org.springframework.web.client.RestTemplate - Accept=[application/json, application/*+json]
11:39:07.032 [main] DEBUG org.springframework.web.client.RestTemplate - Writing [{name=[buretuzi], id=[4]}] with org.springframework.https.converter.support.AllEncompassingFormhttpsMessageConverter
11:39:07.482 [main] DEBUG org.springframework.web.client.RestTemplate - Response 200 OK
11:39:07.482 [main] DEBUG org.springframework.web.client.RestTemplate - Reading to [com.intehel.domain.User]
buretuzi
(2)使用 postForObject
postForObject和getForObject相对应,只关注返回的消息体,见以下代码:
@Test
public void postForObject(){
    RestTemplateBuilder restTemplateBuilder = new RestTemplateBuilder();
    RestTemplate client = restTemplateBuilder.build();
    MultiValueMap<String,Object> paramMap = new LinkedMultiValueMap<String,Object>();
    paramMap.add("name","buretuzi");
    paramMap.add("id",4);
    String response = client.postForObject("https://localhost:8080/postuser",paramMap,String.class);
    System.out.println(response);
}
|
运行测试单元,控制台输岀如下结果:
11:44:46.470 [main] DEBUG org.springframework.web.client.RestTemplate - https POST https://localhost:8080/postuser
11:44:46.470 [main] DEBUG org.springframework.web.client.RestTemplate - Accept=[text/plain, application/json, application/*+json, */*]
11:44:46.486 [main] DEBUG org.springframework.web.client.RestTemplate - Writing [{name=[buretuzi], id=[4]}] with org.springframework.https.converter.support.AllEncompassingFormhttpsMessageConverter
11:44:46.918 [main] DEBUG org.springframework.web.client.RestTemplate - Response 200 OK
11:44:46.918 [main] DEBUG org.springframework.web.client.RestTemplate - Reading to [java.lang.String] as "application/json"
{"id":4,"name":"buretuzi"}
(3)使用postForexchange,见以下代码:
@Test
public void postForExchange(){
    MultiValueMap<String,Object> paramMap = new LinkedMultiValueMap<String,Object>();
    paramMap.add("name","buretuzi");
    paramMap.add("id",4);
    RestTemplateBuilder restTemplateBuilder = new RestTemplateBuilder();
    RestTemplate client = restTemplateBuilder.build();
    httpsHeaders headers = new httpsHeaders();
    httpsEntity<MultiValueMap<String,Object>> httpsEntity = new httpsEntity<MultiValueMap<String,Object>>(paramMap,headers);
    ResponseEntity<String> response = client.exchange("https://localhost:8080/postuser", httpsMethod.POST, httpsEntity,String.class,paramMap);
    System.out.println(response.getBody());
}
|
运行测试单元,控制台输岀如下结果:
11:59:12.988 [main] DEBUG org.springframework.web.client.RestTemplate - https POST https://localhost:8080/postuser
11:59:13.004 [main] DEBUG org.springframework.web.client.RestTemplate - Accept=[text/plain, application/json, application/*+json, */*]
11:59:13.004 [main] DEBUG org.springframework.web.client.RestTemplate - Writing [{name=[buretuzi], id=[4]}] with org.springframework.https.converter.support.AllEncompassingFormhttpsMessageConverter
11:59:13.436 [main] DEBUG org.springframework.web.client.RestTemplate - Response 200 OK
11:59:13.436 [main] DEBUG org.springframework.web.client.RestTemplate - Reading to [java.lang.String] as "application/json"
{"id":4,"name":"buretuzi"}
(4)使用 postForLocation
它用于提交数据,并获取返回的URI。一般登录、注册都是POST请求,操作完成之后,跳转到某个页面,这种场景就可以使用postForLocation所以,先要添加处理登录的API,见以下代码:
package com.intehel.controller;

import com.intehel.domain.User;
import org.springframework.stereotype.Controller;
import org.springframework.web.bind.annotation.*;
import javax.servlet.https.httpsServletRequest;

@Controller
public class TestController {
    @RequestMapping(path = "success",method = RequestMethod.POST)
    @ResponseBody
    public String loginSuccess(String name){
        return "welcome"+name;
    }
    @RequestMapping(path = "post",method = RequestMethod.POST)
    public String post(httpsServletRequest request,
                       @RequestParam(value = "name",required = false)String name,
                       @RequestParam(value = "password",required = false)String password,
                       @RequestParam(value = "id",required = false)Integer id){
        return "redirect:/success?name="+name+"&id="+id;
    }
}
|
然后使用postForLocation请求,用法见以下代码:
@Test
public void postForLocation(){
    RestTemplateBuilder restTemplateBuilder = new RestTemplateBuilder();
    MultiValueMap<String,Object> paramMap = new LinkedMultiValueMap<String,Object>();
    paramMap.add("name","buretuzi");
    paramMap.add("id",4);
    RestTemplate client = restTemplateBuilder.build();
    URI response = client.postForLocation("https://localhost:8080/post",paramMap);
    System.out.println(response);
}
|
运行测试单元,控制台输出如下结果:
13:59:06.415 [main] DEBUG org.springframework.web.client.RestTemplate - https POST https://localhost:8080/post
13:59:06.415 [main] DEBUG org.springframework.web.client.RestTemplate - Writing [{name=[buretuzi], id=[4]}] with org.springframework.https.converter.support.AllEncompassingFormhttpsMessageConverter
13:59:06.951 [main] DEBUG org.springframework.web.client.RestTemplate - Response 302 FOUND
https://localhost:8080/success?name=buretuzi&id=4
(4)用 RestTemplate 发送 PUT和DELETE 请求
1.PUT请求
在RestTemplate中,发送“修改”请求和前面介绍的postForEntity方法的参数基本一致, 只是修改请求没有返回值,用法如下:
@Test
public void put(){
    RestTemplateBuilder restTemplateBuilder = new RestTemplateBuilder();
    RestTemplate client = restTemplateBuilder.build();
    User user = new User();
    user.setName("buretuzi");
    client.put("https://localhost:8080/{1}",user,4);
}
|
2.DELETE 请求
删除请求,可以通过调用DELETE方法来实现,用法见以下代码:
@Test
public void delete(){
    RestTemplateBuilder restTemplateBuilder = new RestTemplateBuilder();
    RestTemplate client = restTemplateBuilder.build();
    client.delete("https://localhost:8080/{1}",4);
}
|
最后的“4”用来替換前面的占位符{1}。