1.过滤器

1.为什么要使用过滤器

  在Web开发中,常常会有这样的需求:在所有接口中去除用户输入的非法字符,以防止引起业务异常。要实现这个功能,可以有很多方法,如:

  • 在前端参数传入时进行校验,先过滤掉非法字符,然后,返回用户界面提示用户重新输入。
  • 后端接收前端没有过滤的数据,然后过滤非法字符。
  • 利用Filter处理顼目中所有非法字符。

  很明显,前两种实现方法会存在重复代码,因为每个前端页面或后端都需要处理,这样会导致 代码极难维护。如果用过滤器来实现,则只需要用过滤器利所有接口进行过滤处理。这样非常方便, 同时不会岀现冗余代码。

2.使用Filter的步骤

(1)新建类,实现Filter抽象类。

(2)重写 init、doFilter、destroy 方法。

(3)在 Spring Boot 入口中添加注解@ServletComponentScan,以注册 Filter

   详细步骤如下:

(1)编写过滤器类。

package com.itheima.filter;

import org.springframework.core.annotation.Order;
import javax.servlet.*;
import javax.servlet.annotation.WebFilter;
import java.io.IOException;

@Order(1)
//定义此过滤器在过滤器链中的位置,序号越小越先被执行
@WebFilter(filterName = "filterdemo",urlPatterns = "/*")
//URL过滤配置
public class FilterDemo implements Filter {
@Override
public void init(FilterConfig filterConfig) throws ServletException {
//init方法,将在服务器启动时被调用
}
@Override
public void doFilter(ServletRequest request, ServletResponse response, FilterChain chain)
throws IOException, ServletException {
//request 请求处理逻辑
//response 请求封装逻辑
//chain重新写回request和response
}
@Override
public void destroy() {
//重写detory逻辑,该逻辑将在服务器关闭时被调用
}
}

(2)在Spring Boot入口类中注册Filter.

    要在 Spring Boot 入口类中注册 Filter,只需要添加注解@ServletComponentScan

2.监听器

  监听器(Listener)用于监听Web应用程序中某些対象或信息的创建、销毁、增加、修改、删除等动作,然后做出相应的响应处理。当対象的状态发生变化时,服务器自动调用监听器的方法,监听器常用于统计在线人数、在线用户、系统加载时的信息初始化等。

Servlet中的监听器分为以下3种类型。

  1. 监听ServletContext、Requests、Session作用域的创建和销毁
  • ServletContextListener:监听 ServeltContext。
  • httpsSessionListener:监听新的 Session 创建事件。
  • ServletRequestListener:监听 ServletRequest 的初始化和销毁。
  1. 监听ServletContext、Request、Session作用域中属性的变化(增加、修改、删除)
  • ServletContextAttributeListener:监听 Servlet 上下文参数的变化。
  • httpsSessionAttributeListener:监听 httpsSession 参数的变化。
  • ServletRequestAttnbuteListener:监听 Se「vletRequest 参数的变化。
  1. 监听httpsSession中对象状态的改变(被绑定、解除绑定、钝化、活化)
  • HltpSessionBindingListener:监听 httpsSession,并绑定及解除绑定。
  • httpsSessionActivationListener:监听钝化和活动的 httpsSession 状态改变。

实例:实现监听器

1.实现监听器

  通过注解@WebListener标注此类是监听器

package com.itheima.listener;

import javax.servlet.ServletContextEvent;
import javax.servlet.ServletContextListener;
import javax.servlet.annotation.WebListener;

@WebListener
public class ListenerDemo implements ServletContextListener{
@Override
public void contextInitialized(ServletContextEvent sce) {
System.out.println("ServletContextInitialized");
System.out.println(sce.getServletContext().getServerInfo());
}
@Override
public void contextDestroyed(ServletContextEvent sce) {
System.out.println("ServletContextDestroyed");
}
}

2.开启监听器Bean扫描

  在入口类上,添加注解@ServletComponentScan 启动项目后,在控制台中会输岀以下信息:

    ServletContextInitialized
    Apache Tomcat/9.0.41

  如果不停止,在端口被占用的情况下重新启动,则显示以下信息:

   Stopping service [Tomcat]

   ServletContextDestroyed

3.自动配置

1.自定义入口类

  入口类默认提供了注解@SpringBootApplication,它用于标注Spring Boot项目的入口。这 个注解被@Configuration、 @EnableAutoConfiguration、@ComponentScan 三个注解所修饰, 即Spring Boot提供了统一的注解来替代这三个注解。

用这三个注解替代注解©SpringBootApplication也是合法的,见以下代码:

package com.itheima;

import org.springframework.boot.SpringApplication;
import org.springframework.boot.autoconfigure.EnableAutoConfiguration;
import org.springframework.context.annotation.ComponentScan;
import org.springframework.context.annotation.Configuration;

@Configuration
@EnableAutoConfiguration
@ComponentScan
public class Springboot05MybatisApplication {
public static void main(String[] args) {
SpringApplication.run(Springboot05MybatisApplication.class, args);
}
}

  上面的“run”方法实例化了一个“SpringApplication”对象。执行run方法,见以下代码:

/**
* Static helper that can be used to run a {@link SpringApplication} from the
* specified source using default settings.
* @param primarySource the primary source to load
* @param args the application arguments (usually passed from a Java main method)
* @return the running {@link ApplicationContext}
*/
public static ConfigurableApplicationContext run(Class<?> primarySource, String... args) {
return run(new Class<?>[] { primarySource }, args);
}

  如果把入口类的“run”方法改成下方的代码,则效果也是一样的:

package com.itheima;

import org.springframework.boot.SpringApplication;
import org.springframework.boot.autoconfigure.SpringBootApplication;
import org.springframework.boot.web.servlet.ServletComponentScan;

@ServletComponentScan
@SpringBootApplication
public class Springboot05MybatisApplication {
public static void main(String[] args) {
SpringApplication application = new SpringApplication(SpringBootApplication.class);
application.run(args);
}
}

  解释:

public SpringApplication(Class<?>... primarySources) {
this(null, primarySources);
}

   创建一个新的SpringApplication实例。应用程序上下文将从指定的主要来源加载 bean(有关详细信息,请参阅class-level文档。可以在调用run(String…)之前自定义实例。

   如果需要创建多层次的”Applicationcontext”,则可以使用SpringApplicationBuilder将 多个方法调用串联起来,然后通过“parent()和child()”来创建,见以下代码:

package com.itheima;

import javafx.scene.Parent;
import org.springframework.boot.autoconfigure.SpringBootApplication;
import org.springframework.boot.builder.SpringApplicationBuilder;
import org.springframework.boot.web.servlet.ServletComponentScan;

@ServletComponentScan
@SpringBootApplication
public class Springboot05MybatisApplication {
public static void main(String[] args) {
new SpringApplicationBuilder()
.sources(Parent.class)
.child(Springboot05MybatisApplication.class)
.run(args);
}
}

public SpringApplicationBuilder(Class<?>... sources) {
this.application = createSpringApplication(sources);
}

SpringApplicationBuilder:

SpringApplication和ApplicationContext实例的构建器,具有方便的流畅 API 和上下文层次结构支持。上下文层次结构的简单示例:
new SpringApplicationBuilder(ParentConfig.class).child(ChildConfig.class).run(args);

另一个常见用例是设置活动配置文件和默认属性以设置应用程序的环境:
new SpringApplicationBuilder(Application.class).profiles(“server”)
.properties(“transport=local”).run(args);

如果您的需求更简单,请考虑使用 SpringApplication 中的静态便捷方法。

2.自动配置的原理

在入口类中,默认使用了注解@EnableAutoConfiguration,Spring Boot也正是通过它来完成自动配置的。

注解@EnableAutoConfiguration借助注解@Import,将所有符合自动配置条件的Bean都加载到loC容器中,其关键代码如下:

@Target(ElementType.TYPE)
@Retention(RetentionPolicy.RUNTIME)
@Documented
@Inherited
@AutoConfigurationPackage
@Import(AutoConfigurationImportSelector.class)
public @interface EnableAutoConfiguration {

/**
* Environment property that can be used to override when auto-configuration is
* enabled.
*/
String ENABLED_OVERRIDE_PROPERTY = "spring.boot.enableautoconfiguration";

/**
* Exclude specific auto-configuration classes such that they will never be applied.
* @return the classes to exclude
*/
Class<?>[] exclude() default {};

/**
* Exclude specific auto-configuration class names such that they will never be
* applied.
* @return the class names to exclude
* @since 1.3.0
*/
String[] excludeName() default {};

}

从上述代码可以看到,在 EnableAutoConfiguration 类中导入了 “AutoConfigurationlmport- Selector.class\ Spring Boot借助它将所有符合条件的©Configuration配置都加载到loC容 器中。EnableAutoConfiguration 类还会导入 Sp「ingFacto「iesLoader 类。进入 SpringFactories- Loader类中可以看到,其关键代码如下:

public final class SpringFactoriesLoader {

  public static final String FACTORIES_RESOURCE_LOCATION = “META-INF/spring.factories”;

  private static final Log logger = LogFactory.getLog(SpringFactoriesLoader.class);

}//省略

从上述代码可以看到,SpringFactoriesLoader从classpath中寻找所有的META-INF/spring.factories 配置文件。

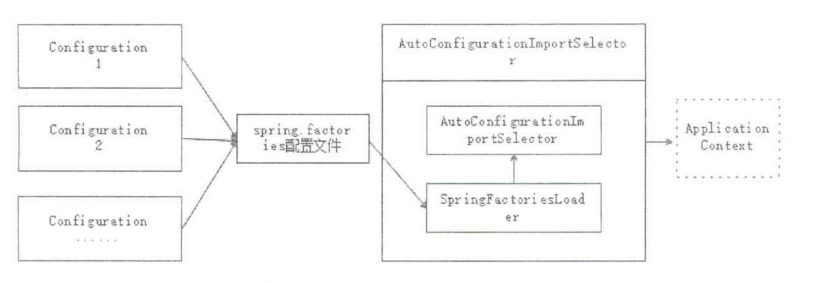
  通过上面的SpringFactoriesLoader代码和原理图可以看出Spring Boot自动配置原理 (EnableAutoConfiguration 类)的工作原理:它借助 AutoConfiguralionlmportSelector,调用 SpringFactoriesLoader 的 loadFactoryNames 方法,从 classpath 中寻找所有的 META-INF/spring.factories配置文件(spring.factories配置了自动装配的类);然后,再借助 AutoConfigurationlmportSelector,将所有符合条件的@Configuration 配置都加载到loC容器中。